Introduction
Welcome to EE219: AI Computing Systems! In this first lab assignment (SIST, ShanghaiTech EE219), we will guide you through setting up your remote development environment and introduce you to basic PyTorch operations. Here’s how you can get started:
Virtual Desktop Account
For this course, we will be utilizing a cloud-based desktop environment to ensure a consistent and powerful computing setup for all students. The cloud desktop is pre-configured with all necessary libraries and tools for our coursework.
To access your cloud desktop, please follow these steps:
- Navigate to the ShanghaiTech virtual desktop portal at this link: VMware Horizon. You can access the remote desktop using either the VMware Horizon Client or directly through a browser.
- Add the server address: vd-new.shanghaitech.edu.cn
- Log in to VMware Horizon and change the initial password. Please check the email from the teaching assistant, which contains the VMware user account and password. When you log in for the first time, you will be required to change your password. Please make sure to remember your newly changed password and do not share your account or password with others.
- Log in to Ubuntu. Click on the icon with the Chinese name of our course. Enter the cloud desktop operating system account name “ubuntu" and use the initial password “uLu)bP9DF" to log in.
- Once logged in, you will be presented with a virtual Ubuntu desktop environment that you can use just like a local machine.
- Now you can explore the usage of the Ubuntu operating system on the virtual desktop. You'll need to self-study some Linux-related operations and commands.
Using VS Code with SSH for Remote Access
To facilitate seamless coding and development workflows, we will use Visual Studio Code (VS Code) in combination with SSH to access your cloud desktop. We have not specified which IDE you should use and we are using VS Code here merely as an example. Here’s how you can set this up:
Install VS Code
Download and install Visual Studio Code from this link: Download Visual Studio Code.
Install Remote-SSH Extension
Open VS Code and navigate to the Extensions view by clicking on the Extensions icon in the Activity Bar on the side of the window. Search for “Remote - SSH” and install the extension.
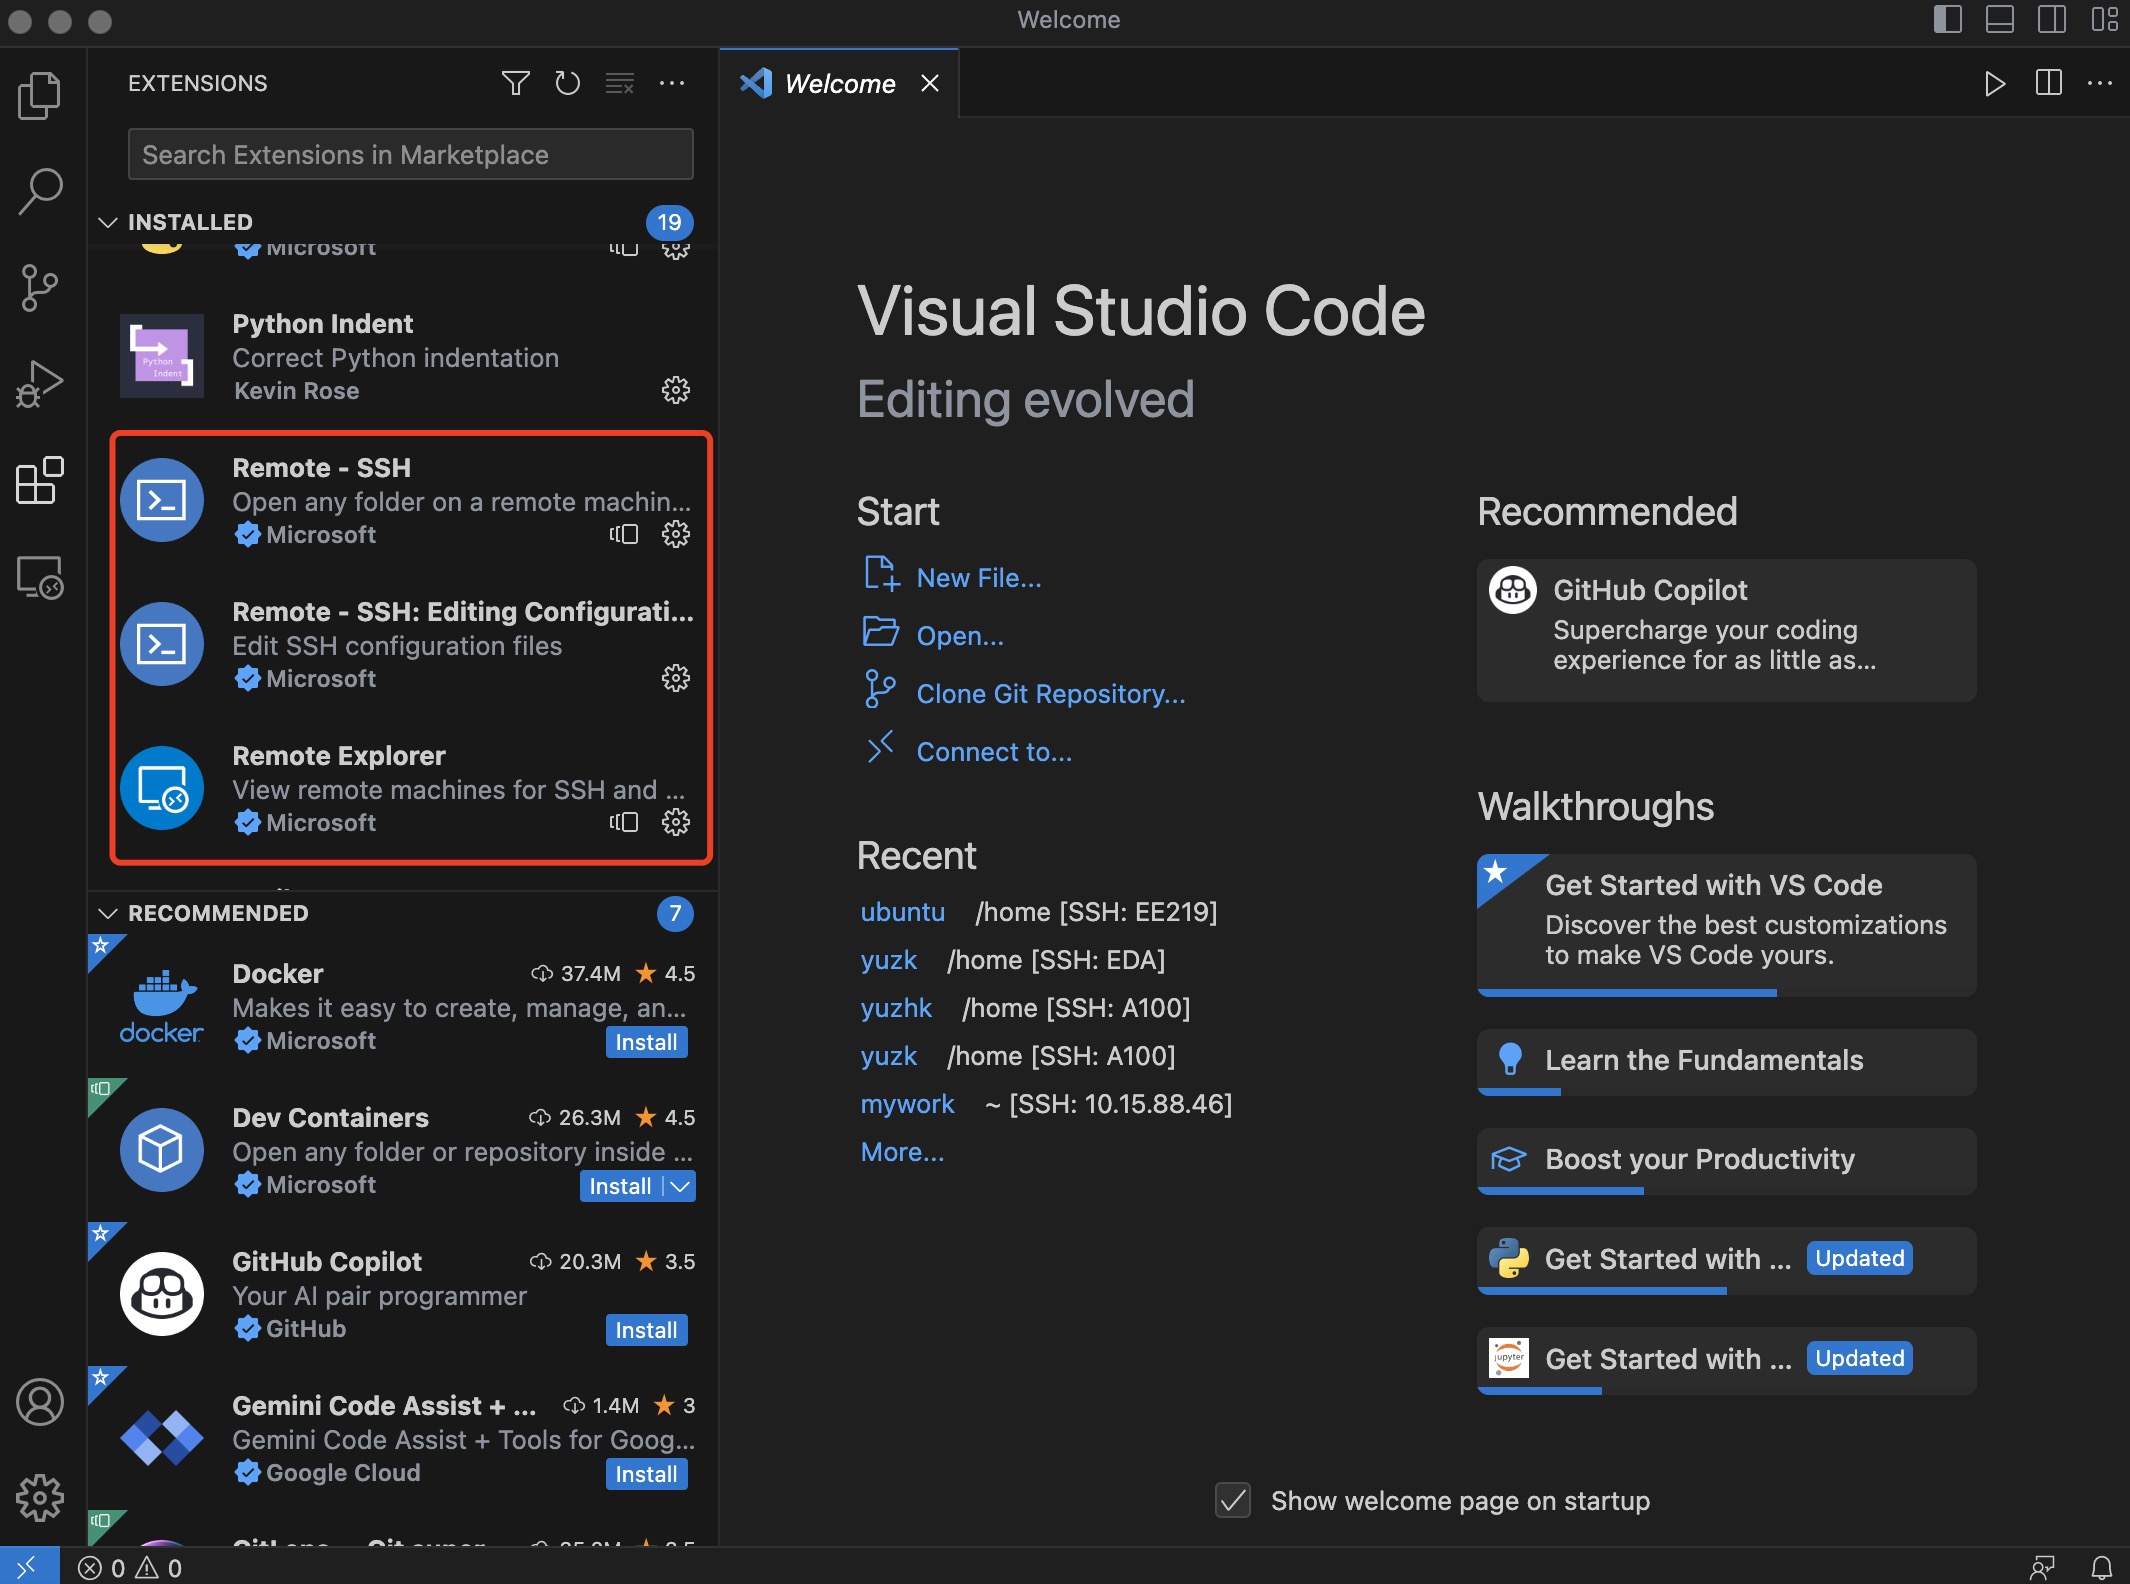
After installing the Remote SSH extension, a button made up of two angle brackets will appear in the bottom left corner. This is a convenient entry point for remote connections.
Change your Ubuntu account password for security
Execute the command “passwd" in the terminal.
$ passwd
Changing password for ubuntu.
Current password:
New password:
Retype new password:
passwd: password updated successfully
The system will prompt you to enter your current password and the new password twice. Because the current password “uLu)bP9DF" is quite lengthy, and for security reasons, please change it. When typing the password, you won't see anything on the screen. This is perfectly normal behavior in Linux systems.
Task 1
(1 point) Save the screenshot of the terminal with your hostname after you have completed changing the password.
Get the IP address of your remote virtual desktop
Open the terminal on the virtual desktop and type “ifconfig". The red box in the Figure 2 below shows your IP address. Please remember it and do not share it with someone else.
$ ifconfig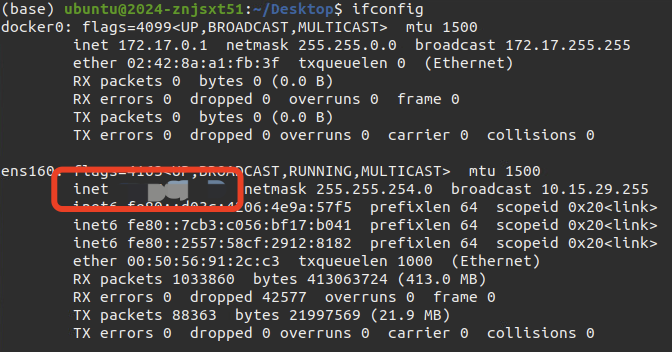
Remember your IP address here.
Configure SSH
Open VS Code command palette (Ctrl+Shift+P) and type Remote-SSH: Add New SSH Host. Or click the convenient entry point in the bottom left corner in Figure 1.
Enter your cloud desktop’s SSH details (e.g., ssh ubuntu@your-virtual-desktop-ip-address). Your IP address can be obtained in Figure 2.
Choose the SSH configuration file you wish to update (typically ∼/.ssh/config). The example configurations are shown below.
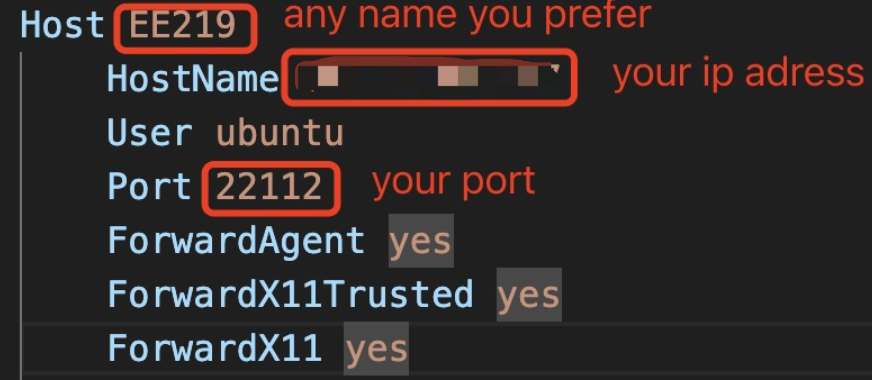
SSH config template.
Connect to Remote Host
After adding the SSH host, you can connect by opening the command palette again and typing Remote-SSH: Connect to Host. Or click the convenient entry point in the bottom left corner in Figure 1. Select the host you’ve just configured. A new VS Code window will open, and you can now interact with the remote cloud desktop environment.
Install Python and Jupyter Extension
Open VS Code and navigate to the Extensions view by clicking on the Extensions icon in the Activity Bar on the side of the window. Search for “Python" and “Jupyter”, then install the extensions. Please ensure that the extension is installed and enabled on the server side.
PyTorch Tutorial
Introduction to Miniconda
Miniconda is a minimal installer for Conda, an open-source package management system and environment management system that helps to simplify the installation and management of software packages and environments. Miniconda includes only Conda and its dependencies, making it a lightweight alternative to the full Anaconda distribution. This allows users to create isolated environments with specific package versions, ensuring compatibility and reproducibility across different projects.
On our virtual desktop, we have already set up an environment with PyTorch, a popular deep learning framework. This pre-configured environment will enable you to run machine learning and deep learning models efficiently, without the need for additional setup. You can activate this environment and start working on your assignments right away.
Environment management
When you see (base) in the command line prompt, it indicates that you are in the base Conda environment. This is the default environment created by Conda when it is first installed. Being in the (base) environment means that any packages installed or commands executed will be within this default environment.
To switch from the (base) environment to the pre-installed PyTorch environment called (torch), you need to activate it. Here are the steps:
- Activate the Torch Environment.
$ conda activate torchAfter running this command, you should see (torch) in the command line prompt, indicating that you are now working within the Torch environment.
- Deactivate the Torch Environment. When you’re done working in the torch environment and wish to return to the base environment, you can deactivate it by running:
$ conda deactivateAfter deactivating, you will see (base) again, indicating that you are back in the base Conda environment.
Package management
pip is the package installer for Python, allowing you to install and manage additional libraries and dependencies that are not part of the standard library. It is an essential tool for Python developers to extend the functionality of Python by downloading and installing third-party packages from the Python Package Index (PyPI).
When you are in a Conda environment (e.g. torch) and want to install some Python packages (e.g. jupyter), you can use the following command.
$ pip install jupyter -i https://pypi.tuna.tsinghua.edu.cn/simple/ Note that “-i" is followed by the Tsinghua University mirror source, which allows us to download and install packages more quickly and steadily.
Feel free to contact TAs if you have any questions or encounter any issues.
Instructions
The goal of this lab is to get you familiarized with basic PyTorch operations. The following are the basic steps.
- Download the provided IPython notebook.
- Upload the notebook to your cloud desktop. You can connect to it via VS Code and directly drag the file into the file directory on the left side.
- Activate the “torch" conda enviroment and run the following command to install the dependencies.
$ conda activate torch $ pip install jupyter ipykernel matplotlib tqdm pandas -i https://pypi.tuna.tsinghua.edu.cn/simple/ - Click on the Jupyter Notebook file to launch it in VS Code. Note that you may need to install the necessary Jupyter extension beforehand. If needed, refer to section 1.2.7.
- Select python environment for this notebook. Look at the top right corner of the page. You will see a button that allows you to select the kernel. Click on the dropdown menu in the top right corner. You will see a list of available kernels and select the kernel corresponding to the “torch" environment.
- Follow the steps in the notebook. Make sure to understand the basic functionalities of PyTorch as these will be fundamental for future labs.
Task 2
(2 points) Save the visualized inference results of the trained model on 40 test images.
Task 3
(2 points) Determine the type of your CPU and GPU, the number of CPU cores, the capacity of DRAM and GPU memory, the version of the Ubuntu operating system, and the PyTorch version within the torch conda environment on your virtual desktop. Save the screenshots of your query command and its results from the command line.
Submission
Compile the content of the above three tasks into a PDF file, name the file with your student ID and name, and upload it via Gradescope.